티스토리 뷰
2022.03.08 - [WPF] - List vs ObservableCollection? part1
2023-02-02 Microsoft.Toolkit.Mvvm nuget package에서 CommunityToolkit.Mvvm으로 변경했습니다
지난 포스트에 이어서 계속 진행 하도록 하겠습니다.
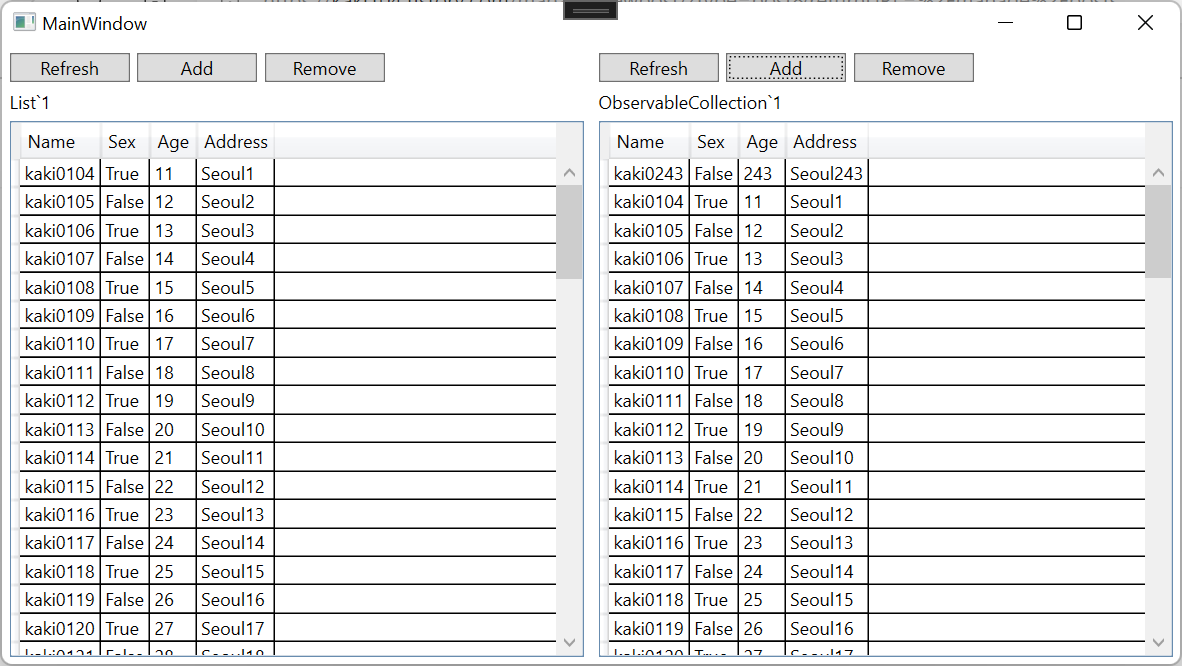
아래 화면에서 Add 버튼을 눌렀을 때의 동작을 추가하도록 하겠습니다.

1. Add 버튼 처리
MainViewModel.cs를 수정합니다.
Add에서 LeftPeople와 RightPeople에 Insert를 이용해서 신규 사용자를 추가합니다.
        private void OnRightButton(string parameter)
        {
            switch (parameter)
            {
                case "Refresh":
                    break;
                case "Add":
                    RightPeople.Insert(0, CreateRandomPerson());
                    break;
                case "Remove":
                    break;
            }
        }

        private void OnLeftButton(string parameter)
        {
            switch (parameter)
            {
                case "Refresh":
                    break;
                case "Add":
                    LeftPeople.Insert(0, CreateRandomPerson());
                    OnPropertyChanged(nameof(LeftPeople));
                    break;
                case "Remove":
                    break;
            }
        }

        ...

        private Person CreateRandomPerson()
        {
            var random = new Random();
            var randomInt = random.Next(200, 1000);
            return new Person
            {
                Name = $"kaki0{randomInt}",
                Sex = randomInt % 2 == 0,
                Age = randomInt,
                Address = $"Seoul{randomInt}"
            };
        }
화면에서는 어떻게 변경되는지 확인 하겠습니다. 먼저 오른쪽에 Add 버튼을 클릭합니다.
kaki0243이라는 사용자가 추가되는것을 바로 확인 할 수 있습니다.

왼쪽 Add 버튼을 클릭합니다. 처음에는 아무런 반응이 없어서 추가되었다는 것을 알 수 없습니다.

그러나, 스크롤바를 아래로 살짝 내렸다가 다시 올리면 추가된 kaki0206 사용자를 볼 수 있습니다.
실제 애플리케이션에서는 이렇게 표시가 되면 않되기 때문에 이 방법은 사용할 수 없습니다.

특히, 이 방법을 사용한 경우 스크롤바를 아래로 계속 내리면, 오류가 발생합니다. 컨트롤에 표시되는 내용과 실제 데이터 간의 동기화가 이루어지지 않아서 발생하는 오류로 생각됩니다. 더보기를 누르면 에러 내용을 확인할 수 있습니다.
System.InvalidOperationException HResult=0x80131509 Message=An ItemsControl is inconsistent with its items source.\n See the inner exception for more information. Source=PresentationFramework StackTrace: at System.Windows.Controls.ItemContainerGenerator.Verify() at System.Windows.Controls.VirtualizingStackPanel.MeasureChild(IItemContainerGenerator& generator, IContainItemStorage& itemStorageProvider, IContainItemStorage& parentItemStorageProvider, Object& parentItem, Boolean& hasUniformOrAverageContainerSizeBeenSet, Double& computedUniformOrAverageContainerSize, Double& computedUniformOrAverageContainerPixelSize, Boolean& computedAreContainersUniformlySized, Boolean& hasAnyContainerSpanChanged, IList& items, Object& item, IList& children, Int32& childIndex, Boolean& visualOrderChanged, Boolean& isHorizontal, Size& childConstraint, Rect& viewport, VirtualizationCacheLength& cacheSize, VirtualizationCacheLengthUnit& cacheUnit, Int64& scrollGeneration, Boolean& foundFirstItemInViewport, Double& firstItemInViewportOffset, Size& stackPixelSize, Size& stackPixelSizeInViewport, Size& stackPixelSizeInCacheBeforeViewport, Size& stackPixelSizeInCacheAfterViewport, Size& stackLogicalSize, Size& stackLogicalSizeInViewport, Size& stackLogicalSizeInCacheBeforeViewport, Size& stackLogicalSizeInCacheAfterViewport, Boolean& mustDisableVirtualization, Boolean isBeforeFirstItem, Boolean isAfterFirstItem, Boolean isAfterLastItem, Boolean skipActualMeasure, Boolean skipGeneration, Boolean& hasBringIntoViewContainerBeenMeasured, Boolean& hasVirtualizingChildren) at System.Windows.Controls.VirtualizingStackPanel.MeasureOverrideImpl(Size constraint, Nullable`1& lastPageSafeOffset, List`1& previouslyMeasuredOffsets, Nullable`1& lastPagePixelSize, Boolean remeasure) at System.Windows.Controls.VirtualizingStackPanel.MeasureOverride(Size constraint) at System.Windows.FrameworkElement.MeasureCore(Size availableSize) at System.Windows.UIElement.Measure(Size availableSize) at System.Windows.ContextLayoutManager.UpdateLayout() at System.Windows.UIElement.UpdateLayout() at System.Windows.Controls.VirtualizingStackPanel.<>c__DisplayClass94_0.<InitializeViewport>b__0() at System.Windows.Threading.ExceptionWrapper.InternalRealCall(Delegate callback, Object args, Int32 numArgs) at System.Windows.Threading.ExceptionWrapper.TryCatchWhen(Object source, Delegate callback, Object args, Int32 numArgs, Delegate catchHandler) at System.Windows.Threading.DispatcherOperation.InvokeImpl() at MS.Internal.CulturePreservingExecutionContext.CallbackWrapper(Object obj) at System.Threading.ExecutionContext.RunInternal(ExecutionContext executionContext, ContextCallback callback, Object state) --- End of stack trace from previous location --- at System.Runtime.ExceptionServices.ExceptionDispatchInfo.Throw() at MS.Internal.CulturePreservingExecutionContext.Run(CulturePreservingExecutionContext executionContext, ContextCallback callback, Object state) at System.Windows.Threading.DispatcherOperation.Invoke() at System.Windows.Threading.Dispatcher.ProcessQueue() at System.Windows.Threading.Dispatcher.WndProcHook(IntPtr hwnd, Int32 msg, IntPtr wParam, IntPtr lParam, Boolean& handled) at MS.Win32.HwndWrapper.WndProc(IntPtr hwnd, Int32 msg, IntPtr wParam, IntPtr lParam, Boolean& handled) at MS.Win32.HwndSubclass.DispatcherCallbackOperation(Object o) at System.Windows.Threading.ExceptionWrapper.InternalRealCall(Delegate callback, Object args, Int32 numArgs) at System.Windows.Threading.ExceptionWrapper.TryCatchWhen(Object source, Delegate callback, Object args, Int32 numArgs, Delegate catchHandler) at System.Windows.Threading.Dispatcher.LegacyInvokeImpl(DispatcherPriority priority, TimeSpan timeout, Delegate method, Object args, Int32 numArgs) at MS.Win32.HwndSubclass.SubclassWndProc(IntPtr hwnd, Int32 msg, IntPtr wParam, IntPtr lParam) at MS.Win32.UnsafeNativeMethods.DispatchMessage(MSG& msg) at System.Windows.Threading.Dispatcher.PushFrameImpl(DispatcherFrame frame) at System.Windows.Threading.Dispatcher.PushFrame(DispatcherFrame frame) at System.Windows.Threading.Dispatcher.Run() at System.Windows.Application.RunDispatcher(Object ignore) at System.Windows.Application.RunInternal(Window window) at System.Windows.Application.Run() at ListVsObservableCollection.App.Main() Inner Exception 1: Exception: Information for developers (use Text Visualizer to read this): This exception was thrown because the generator for control 'System.Windows.Controls.DataGrid Items.Count:82' with name '(unnamed)' has received sequence of CollectionChanged events that do not agree with the current state of the Items collection. The following differences were detected: Accumulated count 81 is different from actual count 82. [Accumulated count is (Count at last Reset + #Adds - #Removes since last Reset).] One or more of the following sources may have raised the wrong events: System.Windows.Controls.ItemContainerGenerator System.Windows.Controls.ItemCollection System.Windows.Data.ListCollectionView * System.Collections.Generic.List`1[[ListVsObservableCollection.Person, ListVsObservableCollection, Version=1.0.0.0, Culture=neutral, PublicKeyToken=null]] (The starred sources are considered more likely to be the cause of the problem.) The most common causes are (a) changing the collection or its Count without raising a corresponding event, and (b) raising an event with an incorrect index or item parameter. The exception's stack trace describes how the inconsistencies were detected, not how they occurred. To get a more timely exception, set the attached property 'PresentationTraceSources.TraceLevel' on the generator to value 'High' and rerun the scenario. One way to do this is to run a command similar to the following:\n System.Diagnostics.PresentationTraceSources.SetTraceLevel(myItemsControl.ItemContainerGenerator, System.Diagnostics.PresentationTraceLevel.High) from the Immediate window. This causes the detection logic to run after every CollectionChanged event, so it will slow down the application.

LeftPeople에 한사람을 추가하고 화면에 바로 표시하기 위해서는 아래의 방법을 사용할 수 있습니다.
LeftPeople를 새로운 List로 하나 만들고, 그 List에 새사람을 추가한 후에 LeftPeople에 다시 넣어줍니다.
이렇게하면 추가된 내용이 바로 화면에 보이면서, 오류도 발생하지 않습니다.
ToList()는 new List<Person>(LeftPeople)를 호출한 것과 동일합니다. 즉, 새로운 List를 생성하는 것이기 때문에 대량의 데이터를 이렇게 처리하는 것은 비효율적이라고 생각됩니다.
        private void OnLeftButton(string parameter)
        {
            switch (parameter)
            {
                case "Refresh":
                    break;
                case "Add":
                    var list = LeftPeople.ToList();
                    list.Insert(0, CreateRandomPerson());
                    LeftPeople = list;
                    break;
                case "Remove":
                    break;
            }
        }
2. Remove 버튼 처리
아이템을 삭제하기 위해서는 어떤 아이템을 삭제할지를 정해야 합니다. 그래서, 이 때 사용되는 것이 DataGrid의 SelectedItem 프로퍼티와 SelectedLeftPerson을 TwoWay로 바인딩하면, 뷰모델에서 어떤 아이템이 선택되었는지 확인이 가능합니다.
        <DataGrid
            Grid.Row="2"
            Grid.Column="0"
            Margin="5"
            AutoGenerateColumns="False"
            CanUserAddRows="False"
            ItemsSource="{Binding LeftPeople, Mode=TwoWay}"
            SelectedItem="{Binding SelectedLeftPerson, Mode=TwoWay}">
            <DataGrid.Columns>
                <DataGridTextColumn Binding="{Binding Name}" Header="Name" />
                <DataGridTextColumn Binding="{Binding Sex}" Header="Sex" />
                <DataGridTextColumn Binding="{Binding Age}" Header="Age" />
                <DataGridTextColumn Binding="{Binding Address}" Header="Address" />
            </DataGrid.Columns>
        </DataGrid>
private Person _selectedLeftPerson;
/// <summary>
/// 왼쪽에서 선택된 사람
/// </summary>
public Person SelectedLeftPerson
{
get { return _selectedLeftPerson; }
set { SetProperty(ref _selectedLeftPerson, value); }
}이번에는 Remove 버튼을 제어하도록 하겠습니다. Remove 버튼에 연결할 커맨드를 새로 추가합니다.
아래 소스처럼 LeftRemoveCommand를 추가하는데, 이 커맨드는 IRelayCommand를 이용하도록 했습니다.
LeftRemoveCommand에 RelayCommand를 생성해서 추가할 때, 버튼을 누르면 OnLeftButton에 "Remove"라는 택스트를 넘기도록 만들었고, () => SelectedLeftPerson != null은 이 커맨드를 사용할 수 있는 조건입니다. 즉, 이 커맨드를 사용하기 위해서는 선택한 사람이 존재해야지만 사용할 수 있는 것입니다.
        /// <summary>
        /// 왼쪽 삭제 커맨드
        /// </summary>
        public IRelayCommand LeftRemoveCommand { get; set; }

        ...

        LeftRemoveCommand = new RelayCommand(() => OnLeftButton("Remove"), () => SelectedLeftPerson != null);
MainWindow.xaml 수정합니다.
Remove 버튼의 Command를 수정합니다. LeftRemoveCommand는 Remove 버튼 전용이기 때문에 CommandParameter는 삭제 했습니다.
            <Button
                Width="80"
                Margin="5,0,0,0"
                Command="{Binding LeftRemoveCommand}"
                Content="Remove" />
실행을 하고 데이터를 선택해 봅니다. 아래 그림처럼 아이템을 선택했지만, Remove버튼이 활성화 되지 않습니다.
LeftRemoveCommand의 사용가능/불가능 조건은 미리 입력을 했지만, 그 조건을 다시 확인하는 과정이 추가로 들어가야 하기 때문에 LeftRemoveCommand가 활성화되지 않습니다.

MainViewModel.cs를 수정합니다.
Init() 메소드 아래를 보시면 PropertyChanged += MainViewModel_PropertyChanged;를 추가한 것을 볼 수 있습니다.
즉, 뷰모델 내부에서 발생한 프로퍼티 체인지 이벤트는 모두 MainViewModel_PropertyChanged로 넘어 갑니다.
이벤트 핸들러 내부에는 SelectedLeftPerson과 SelectedRightPerson이 있어서, 해당 프로퍼티가 변경되었다면, LeftRemoveCommand.NotifyCanExecuteChanged() 메소드를 실행시켜 줍니다. 이 메소드는 커맨드의 사용가능 여부 조건을 다시 확인해서 커맨드를 활성/비활성 시킬 수 있습니다.
        /// <summary>
        /// 초기화
        /// </summary>
        private void Init()
        {
            LeftPeople = _persons;
            ((List<Person>)_persons).ForEach(p => RightPeople.Add(p));

            LeftButtonCommand = new RelayCommand<string>(OnLeftButton);
            LeftRemoveCommand = new RelayCommand(() => OnLeftButton("Remove"), () => SelectedLeftPerson != null);
            RightButtonCommand = new RelayCommand<string>(OnRightButton);
            RightRemoveCommand = new RelayCommand(() => OnRightButton("Remove"), () => SelectedRightPerson != null);
            PropertyChanged += MainViewModel_PropertyChanged;
        }

        private void MainViewModel_PropertyChanged(object sender, System.ComponentModel.PropertyChangedEventArgs e)
        {
            switch(e.PropertyName)
            {
                case nameof(SelectedLeftPerson):
                    LeftRemoveCommand.NotifyCanExecuteChanged();
                    break;
                case nameof(SelectedRightPerson):
                    RightRemoveCommand.NotifyCanExecuteChanged();
                    break;
            }
        }

        private void OnRightButton(string parameter)
        {
            switch (parameter)
            {
                case "Refresh":
                    break;
                case "Add":
                    RightPeople.Insert(0, CreateRandomPerson());
                    break;
                case "Remove":
                    {
                        if(SelectedRightPerson == null)
                        {
                            return;
                        }
                        RightPeople.Remove(SelectedRightPerson);
                    }
                    break;
            }
        }

        private void OnLeftButton(string parameter)
        {
            switch (parameter)
            {
                case "Refresh":
                    break;
                case "Add":
                    {
                        var list = LeftPeople.ToList();
                        list.Insert(0, CreateRandomPerson());
                        LeftPeople = list;
                    }
                    break;
                case "Remove":
                    {
                        if(SelectedLeftPerson == null)
                        {
                            return;
                        }
                        var list = LeftPeople.ToList();
                        list.Remove(SelectedLeftPerson);
                        LeftPeople = list;
                    }
                    break;
            }
        }
다시 실행하고, 아이템을 선택 하면 아래와 같이 Remove버튼이 활성되는 것을 알 수 있습니다.

Remove 버튼을 누르면 선택한 아이템이 삭제되면서 Remove 버튼은 다시 비활성화됩니다.


3. Refresh 버튼 처리
LeftPeople은 List형이기 때문에 데이터를 직접 입력해주면 처음 목록으로 갱신됩니다.
RightPeople은 ObservbaleCollection이기 때문에 Clear()을 이용해서 지운 후 Add를 이용해서 추가해 줍니다.
주의하실 부분은 만약 RightPeople에 List형 데이터를 한번이라도 넣어 버리면, 그 다음부터는 Add 버튼을 눌러서 실시간으로 추가를 해도 화면에 반영이 되지 않는다는 것입니다.
        private void OnRightButton(string parameter)
        {
            switch (parameter)
            {
                case "Refresh":
                    {
                        RightPeople.Clear();
                        foreach (var p in _persons)
                        {
                            RightPeople.Add(p);
                        }
                    }
                    break;
                case "Add":
                    RightPeople.Insert(0, CreateRandomPerson());
                    break;
                case "Remove":
                    {
                        if(SelectedRightPerson == null)
                        {
                            return;
                        }
                        RightPeople.Remove(SelectedRightPerson);
                    }
                    break;
            }
        }

        private void OnLeftButton(string parameter)
        {
            switch (parameter)
            {
                case "Refresh":
                    LeftPeople = _persons;
                    break;
                case "Add":
                    {
                        var list = LeftPeople.ToList();
                        list.Insert(0, CreateRandomPerson());
                        LeftPeople = list;
                    }
                    break;
                case "Remove":
                    {
                        if(SelectedLeftPerson == null)
                        {
                            return;
                        }
                        var list = LeftPeople.ToList();
                        list.Remove(SelectedLeftPerson);
                        LeftPeople = list;
                    }
                    break;
            }
        }
화면은 추가하지 않겠습니다.
MVVM 패턴을 이용해서 개발을 진행할 때 List를 사용할지 ObservableCollection을 사용할지를 잘 판단하시고, 각 데이터형이 가지는 특징을 이해하고 개발하시면 좋은 프로그램을 만들 수 있습니다.

4. 소스
WpfTest/ListVsObservableCollection at master · kaki104/WpfTest (github.com)
GitHub - kaki104/WpfTest
Contribute to kaki104/WpfTest development by creating an account on GitHub.
github.com
'WPF .NET' 카테고리의 다른 글
| [기초] ComboBox, ListBox 중요 프로퍼티 사용법 part1 (2) | 2022.03.14 |
|---|---|
| Microsoft.Toolkit.Mvvm을 이용한 간단한 프레임워크 part5 - 금액 표시 컨트롤 만들기 (0) | 2022.03.11 |
| List vs ObservableCollection? part1 (1) | 2022.03.08 |
| Microsoft.Toolkit.Mvvm을 이용한 간단한 프레임워크 part4 - LayerPopup 추가 (13) | 2022.03.03 |
| Microsoft.Toolkit.Mvvm을 이용한 간단한 프레임워크 part3 - Busy 화면 구현 (0) | 2022.03.02 |
- Total
- Today
- Yesterday
- uno-platform
- Visual Studio 2022
- #prism
- kiosk
- .net
- ef core
- Microsoft
- dotNETconf
- C#
- windows 11
- #Windows Template Studio
- UWP
- Always Encrypted
- visual studio 2019
- uno platform
- Behavior
- WPF
- ComboBox
- IOT
- XAML
- LINQ
- Build 2016
- .net 5.0
- Cross-platform
- PRISM
- Bot Framework
- MVVM
- #MVVM
- #uwp
- Windows 10
| 일 | 월 | 화 | 수 | 목 | 금 | 토 |
|---|---|---|---|---|---|---|
| 1 | 2 | 3 | 4 | 5 | 6 | 7 |
| 8 | 9 | 10 | 11 | 12 | 13 | 14 |
| 15 | 16 | 17 | 18 | 19 | 20 | 21 |
| 22 | 23 | 24 | 25 | 26 | 27 | 28 |
